
How to Stop Email Spoofing in Office 365
How Dangerous is Email Spoofing for Your Business?
According to that same PhishMe report, spoofing attacks rely on people’s curiosity and desire for entertainment or rewards. Coupons, reward programs and giveaways are the easiest way to gather information, people just cannot say no to a great deal. The result is that spoofing and phishing attacks are estimated to have cost $18 billion in losses for global businesses.
This can cost your company time and money… serious money. Attackers are getting more sophisticated, leveraging employee desires and specific mail programs (including mobile clients) to fake their email address to get information.
What this means is that, in no small part, it is up to system administrators to provide protection against spoofing prior to the email reaching an employee’s mailbox, and plenty of warnings when that employee reads a potentially dangerous email.
Terms to Know
With that in mind, let’s get down to how you prevent email spoofing in your Office 365 network.
There are several security measures that you can use to do so, but the primary (and most contemporary) methods are the following:
Sender Policy Framework (SPF)
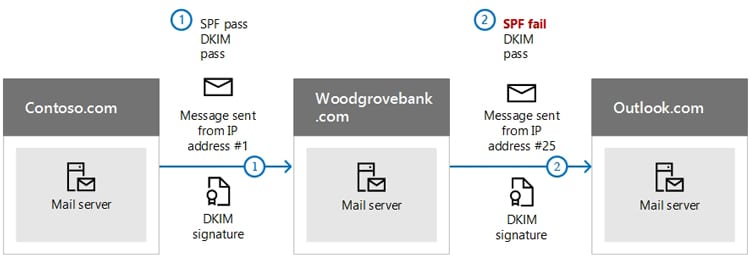
Creating a Sender Policy Framework (SPF) record. The SPF is a record in your DNS Zone file that limits the IP addresses and domains that are authorized to send emails from your domain. This allows receiving mail servers to authenticate emails from your domain against your registered IP address but requires that the receiving server is authenticating against your SPF record as well.
Click here for steps on creating an SPF Record in Office 365.
Domain Keys Identified Mail (DKIM)
Creating Domain Keys Identified Mail (DKIM) hash for emails. The DKIM protocol describes a method of using a cryptographic hash of some or all an email. This hash is then used as part of a public key verification process that authenticates that the email is from an authorized sender on your domain.
Domain-Based Message Authentication, Reporting, and Conformance
Creating a Domain-Based Message Authentication, Reporting, and Conformance (DMARC) record. DMARC is a creation of PayPal engineers in collaboration with Yahoo! Mail and Google. It uses both SPF and DKIM as a larger-scale verification process for email. Basically, DMARC is a protocol that email senders and receivers can use to specify how to handle certain kinds of email that have passed or failed SPF or DKIM checks, based on a set of criteria.
Click here for the steps to set up DMARC records in Office 365.
Creating an SPF Record in Office 365
To create an SPF record for your Microsoft Office 365 network, you’ll need the following:
- Access to the DNS Zone File for your Office 365 Mail domain. This is where you will enter your SPF TXT record. If you have set up an Office 365 mail domain. You can locate the SPF file by following these instructions .
- The domain names for all third-party email you plan to send through Office 365.
- Internal IP addresses for all messaging services in your Office 365 network.
Prevent spoofing of your email
To set up a record that will prevent spoofing of your email, you’ll use a specific syntax depending on your needs. The following record should protect your email system:
v=spf1 include:spf.protection.bristeeritech.com -all
Which breaks down as follows:
- “v=spf1” is the standard opening tag for SPF records.
- “include:spf.protection.bsristeeritech.com” outlines that your Exchange Server email is using SPF protection. In this case, the domain is “bristeeritech.com”.
- “-all” is the standard enforcement rule.
With this record, your Office 365 domain will be set up for SPF coverage.
With 3rd Party Sending Emails
If you have a third party domain that you are sending email from (let’s say @quickbooksonline.com), then you’d have an SPF record that looks like the following:
v=spf1 include: spf.protection.bristeeritech.com include:quickbooksonline.com -all
Which breaks down as follows:
- “v=spf1” is the standard opening tag for SPF records.
- “include:quickbooksonline.com” outlines that you are using the domain @quickbooksonline as a third party email.
- “-all” is the standard enforcement rule.
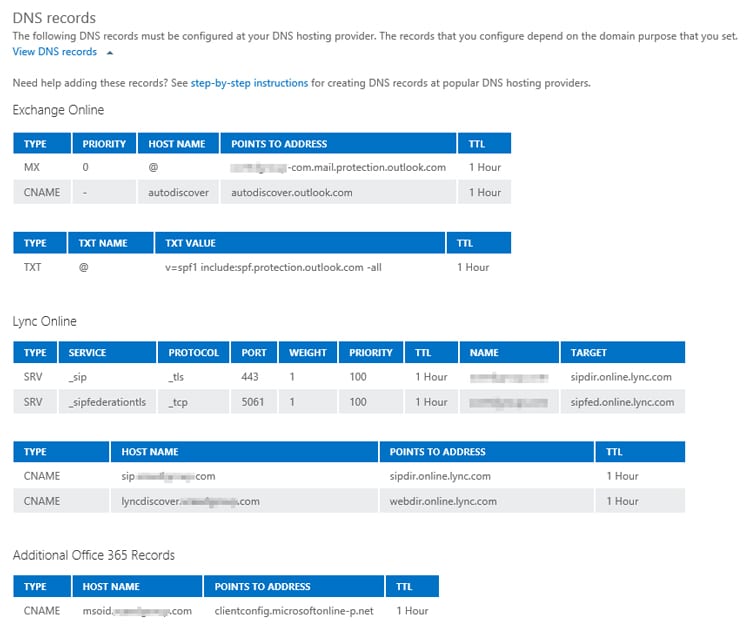
To create a DKIM record, you need to do two things:
First, create two CNAME records for your domain in DNS (instructions can be found here). For a single domain, the format for CNAME will look like the following (where “bristeeritech.com” is the email domain used by your Office 365 network):
- Host name: selector1._domainkey
Points to address or value: **selector1-bristeeritech-com**._domainkey.bristeeritech.onmicrosoft.com
TTL: 3600 - Host name: selector2._domainkey
Points to address or value: **selector2-bristeeritech-com**._domainkey.bristeeritech.onmicrosoft.com
TTL: 3600
Second, enable DKIM signing:
- Sign into Office 365 select the App launcher and select “Admin”.
- In the lower-left navigation, expand Admin and choose “Exchange”.
- Go to Protection > dkim.
- Select the domain for which you want to enable DKIM and then, for Sign messages for this domain with DKIM signatures, choose “Enable”.
You can follow these same steps for each email domain in your Office 365 account to enable DKIM.
DMARC Record in Office 365
To use DMARC, you need to institute records for both incoming and outgoing mail.
Luckily, DMARC is already configured for inbound mail in Office 365.
Outbound mail gets a little trickier if you are using custom domains. If you aren’t using custom domains, then DMARC is already configured for your server.
If you are using custom domains, then setting up DMARC is relatively simple (here, we’ll use an example for the “bristeeritech.com” example above, created automatically using the DMARC Record Generator from MX Toolbox):
- Setup and enable SPF.
- Setup and enable DKIM.
- Enter the following line into the DMARC TXT record into your DNS:
_dmarc.bristeeritech.com 3600 IN TXT “ v=DMARC1; p=quarantine; fo=1; pct=100 rua=mailto:dmarc@bristeeritech.com; ruf=mailto:spam@bristeeritech.com;”
Where
- “_dmarc.domain” is the domain your setting up DMARC for.
- “3600” is the time to live, i.e. the length of time DNS registrars will re-check the record and update their servers. A normal time here is 3600, which is 3600 seconds (1 hour).
- “pct=100;” means that this rule should apply to 100% of outgoing emails.
- “rua=mailto:dmarc@bristeeritech.com” defines the destination email for DMARC reporting.
- “ruf=mailto:966c6c70@bristeeritech.com” defines the mailbox that receives failure reports from DMARC.
- “fo=1” is the code signaling what kind of reporting DMARC should provide. A 1 in this case is simply for emails that do not pass DMARC authentication.
- “p=quarantine” defines the action the DMARC rule should take when an email fails authentication:
- “none”= take no action
- “quarantine”= quarantine the message (send to spam)
- “reject”= reject the message.
Once SPF, DKIM, and DMARC are enabled, you have a system in place that:
- Verifies incoming emails against IP addresses in DNS records.
- Uses encryption to sign and authenticate participating messages so that your system knows that they came from where they say they did.
- Validates both reverse-path addresses and “from” addresses visible to the user.
- Automates spam controls or bounce backs based on authentication.
- Authenticates itself against your existing DNS records and aliases so email from your organization is more difficult to spoof.
Teach Employees How to Spot a Spoofed Email
With all these automatic systems in place, your Office 365 system should be protected. However, no automatic protection is 100% foolproof, and spoofed emails can still get through.
As hard as it is to say, this is where you must educate your users as to what spoofing is, and how they can avoid it.
Let’s consider a scenario in which you’ve set up your SPF authentication record, your DKIM authentication records, and your DMARC rules. These tools will go a long way in filtering bad emails from attackers attempting large-scale spoofing.
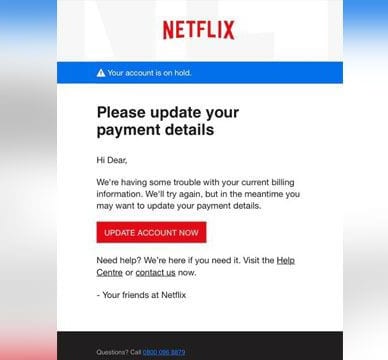
But then an attacker finds out the name of one of your executives. Remember that hacking isn’t all about online security breaches and expensive computers dueling it out over cyberspace. The best attacks sneak in under the radar because the attacker knew something about your organization and took advantage of it.
So, this attacker sends an email to someone in your organization using that executive’s name:
Executive: John W. Executive
Work Email: John.w.Executive@BristeeriTech.com
Attacker’s spoofed email: john.w.executive@gmail.com
In this scenario, the attacker can set up a Gmail account (or any other email account) using your executive’s name. The discerning eye will notice that the email is from a Gmail account right away. However, many email clients such as Outlook, don’t show the incoming email address to users. They just show the name.
And then the user, not checking up on the sender, sees John W. Executive sent them an email and react accordingly.
This is especially challenging for email clients tied to your Office 365 server… you don’t have any control over how they display emails.
However, you can control the visual cues that your users get when an email comes through. In this case, a warning banner.
Simply go to the Admin Center, select “Mail Flow”, and create a new rule. Office 365 mail flow rules let you decide what happens to email depending on specific criteria like its point of origin.
You’ll get a popup that allows you to specify that condition.
Do the following:
- Select ‘the sender is located:’
- Select ‘Outside the organization’
- Select ‘Do the following” and
- Select ‘Apply a disclaimer to the message’ followed by ‘prepend a disclaimer’
Here, you can insert HTML code to create a text banner with a background color to notify the user that the email isn’t from who they think it is from. We recommend something red and angry, to get their attention.
Third Party Support
Did you know that studies show that users respond even more to spoofed emails (as part of phishing scams) than they do legitimate marketing emails? According to Sophos, 41% of IT managers report daily online phishing attacks, and 30% of employees open emails they believe are from legitimate sources.
With statistics like that, it can seem like an uphill battle. With that in mind, it doesn’t hurt to have additional support as well. Consider including a third-party security software platform as part of your anti-spoofing solution so that you have some backup for your own security efforts.
The Sophos Intercept X system, for example, provides additional controls to scan emails and email addresses to secure your email. This system learns from attacks and learns how to respond even after your users accidentally open or click on a spoofed email.
Bristeeri Tech provides the Sophos Intercept X system, including management and installation services. We are proud to be Sophos certified engineers that offer managed IT packages to our business clients.
Conclusion: Stop Spoofed Email and Secure Office 365
As we’ve illustrated. There are several ways to stop spoofed email in Office 365. Built-in tools allow you to set up the minimum standards for email protection. Setting SPF, DKIM, and DMARC restrictions can go a long way towards protecting your users from attack, and Office 365 allows you to automate these security measures easily.
But as attackers get smarter, you need more.
First, no protection is enough if your users don’t know how to protect themselves. Take time to train them and provide plenty of warnings about the emails they receive.
Second, investigate third-party security software that can serve as backup for your current security efforts. No one is an island unto themselves, and many of these services are built by security experts whose entire livelihoods depend on securing email networks like your own.
At the end of the day, use every tool you must to manage how to stop spoofed emails in Office 365.
Hours
M-F: 9am – 6pm
S-S: Closed